Category: Uncategorized

  • Why Some Promotional Frisbees Fly Straight and Others Wobble

    Why Some Promotional Frisbees Fly Straight and Others Wobble

    Two custom discs can look identical in a mockup and behave nothing alike in the air. One sails flat across a parking lot at a company picnic; the other flutters, dives, and lands ten feet short. The difference is almost never the print. It is a handful of physical specifications that most promotional buyers never see on a product page: weight, diameter, rim geometry, and the plastic itself. Understanding how those four levers work lets you order a disc that actually flies for the people who will throw it, instead of one that only photographs well.

    Weight is the single biggest lever

    Weight decides how a disc fights the wind and how much effort it takes to throw. The widely used Ultimate regulation weight is 175 grams, heavy enough to hold a line in a breeze and the reason competition discs feel so stable. Recreational and promotional discs usually come in lighter, often somewhere in the region of 90 to 120 grams for a standard nine- to ten-inch disc, which makes them easier for casual throwers and children to launch but more prone to drifting on a gusty day. At the extremes you will find featherweight mini discs of only a couple of dozen grams, and specialty heavyweight discs around 200 grams built specifically to punch through wind. None of these is objectively better; the right weight depends entirely on who is throwing and where. The chart below shows how the common categories stack up.
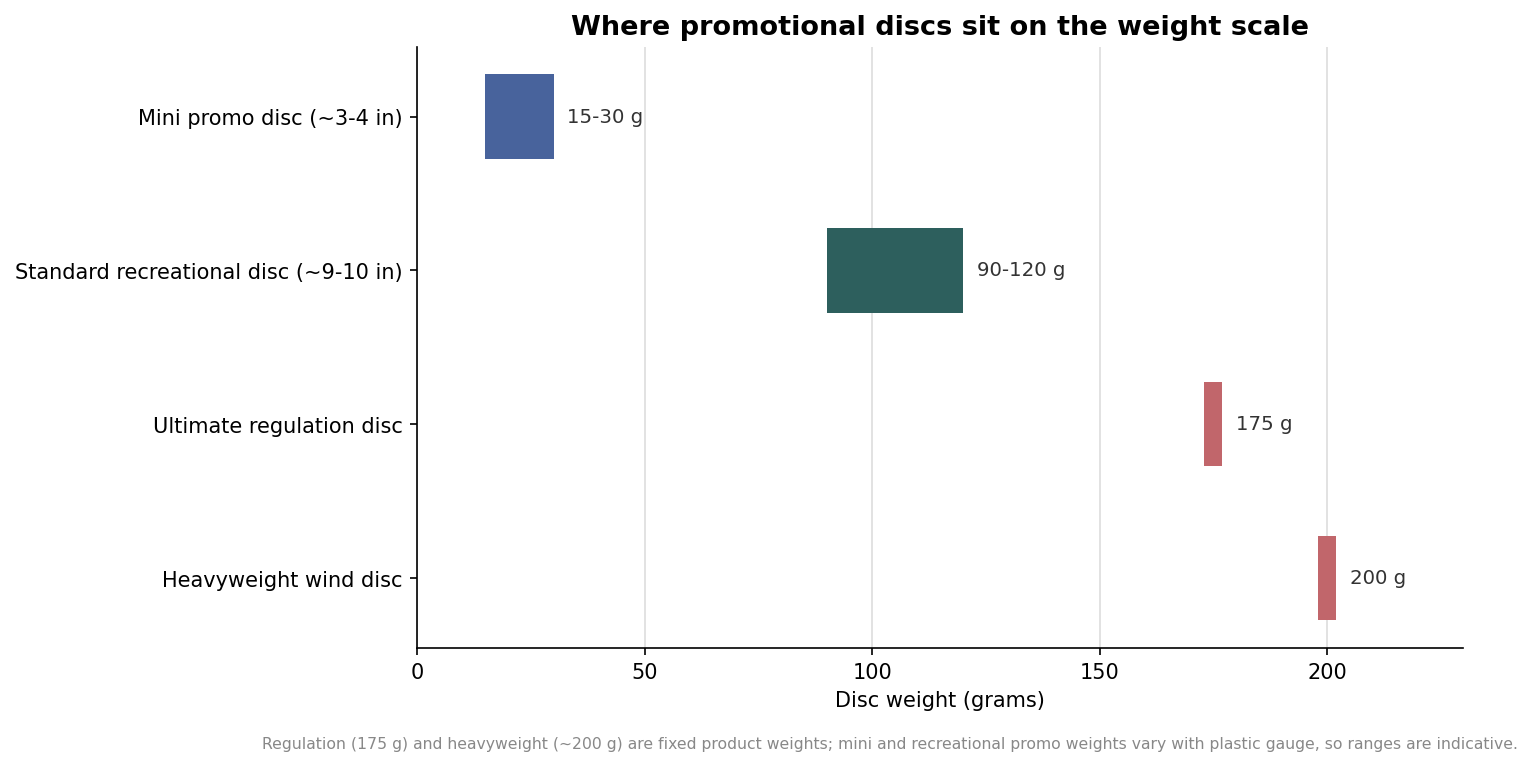
    Floating bar chart of flying disc weight ranges in grams for mini promo, standard recreational, Ultimate regulation, and heavyweight wind discs
    Regulation discs weigh 175 g; promotional discs usually run lighter and vary by plastic gauge.

    Diameter and the recreational-versus-regulation gap

    Diameter sets the aerodynamic surface and, along with weight, how the disc feels in the hand. A regulation Ultimate disc runs about 27 centimeters, roughly 10.75 inches, across. Standard promotional discs cluster a little smaller, commonly in the eight- to ten-inch range, with mini discs down around three to four inches used more as novelties and keepsakes than as real throwing tools. Bigger is not automatically better here. A larger disc presents more surface for lift but also more surface for the wind to grab, and a nine-inch disc in a lighter gauge is often the sweet spot for a giveaway that has to work for a wide range of ages and arm strengths. If the disc is meant to be genuinely thrown rather than pinned to a memo board, stay close to the recreational nine- to ten-inch band and let weight do the fine-tuning.

    The rim does the aerodynamic work

    The flat top gets the print, but the rim is what makes a disc a disc. Most of the mass sits in that rolled edge, and concentrating weight at the perimeter is what gives a spinning disc its gyroscopic stability, the stubborn tendency to keep its orientation once it leaves your hand. A deeper, heavier rim resists wobble and tracks straighter, which is why serious flying discs feel weighted toward the outside rather than the center. A shallow, thin rim on a cheap disc spins down faster and starts to tumble sooner, and no amount of throwing technique fully compensates. The way the mold distributes plastic between the flat flight plate and the rim is effectively invisible in a photo, yet it is the difference between a disc that glides and one that stalls. When you compare quotes, a disc that specifies a defined rim depth and edge weight is telling you it was engineered to fly, while one that only lists overall diameter and a print area may not have been. If a sample is available before a large run, spin one hard on a flat surface: a well-balanced disc settles into a long, steady spin, and a poorly molded one lurches off to one side almost immediately.

    Plastic choice changes flight, feel, and durability

    The polymer is where flight performance and print quality meet cost. Flying discs are typically molded from polyethylene or polypropylene, and the grade matters. LDPE, low-density polyethylene, is the flexible option: its branched molecular structure makes it soft and forgiving, so the disc bends rather than cracks and feels friendly in a child’s hand. HDPE is the rigid, durable end, with a denser, more linear structure, better impact and UV resistance, and a stiffer flight that holds its shape in wind. Polypropylene sits nearby as a light, resilient middle path. The density differences are small in absolute terms but consistent, and they track directly to how stiff the finished disc feels. The dot plot below shows the typical ranges. For decoration, stiffer surfaces tend to hold a crisp pad print or screen print well, while very flexible material can demand inks formulated to flex with the disc so the artwork does not crack over time. Durability matters beyond the print, too: a disc handed out at an outdoor event will live in sun, gravel, and car trunks, and the HDPE end of the range shrugs off that abuse far better than a soft LDPE disc that scuffs and creases. The trade-off is feel, since the stiffest discs are also the ones most likely to sting a young catcher’s hands, which is exactly why matching the plastic to the audience matters as much as matching the weight.
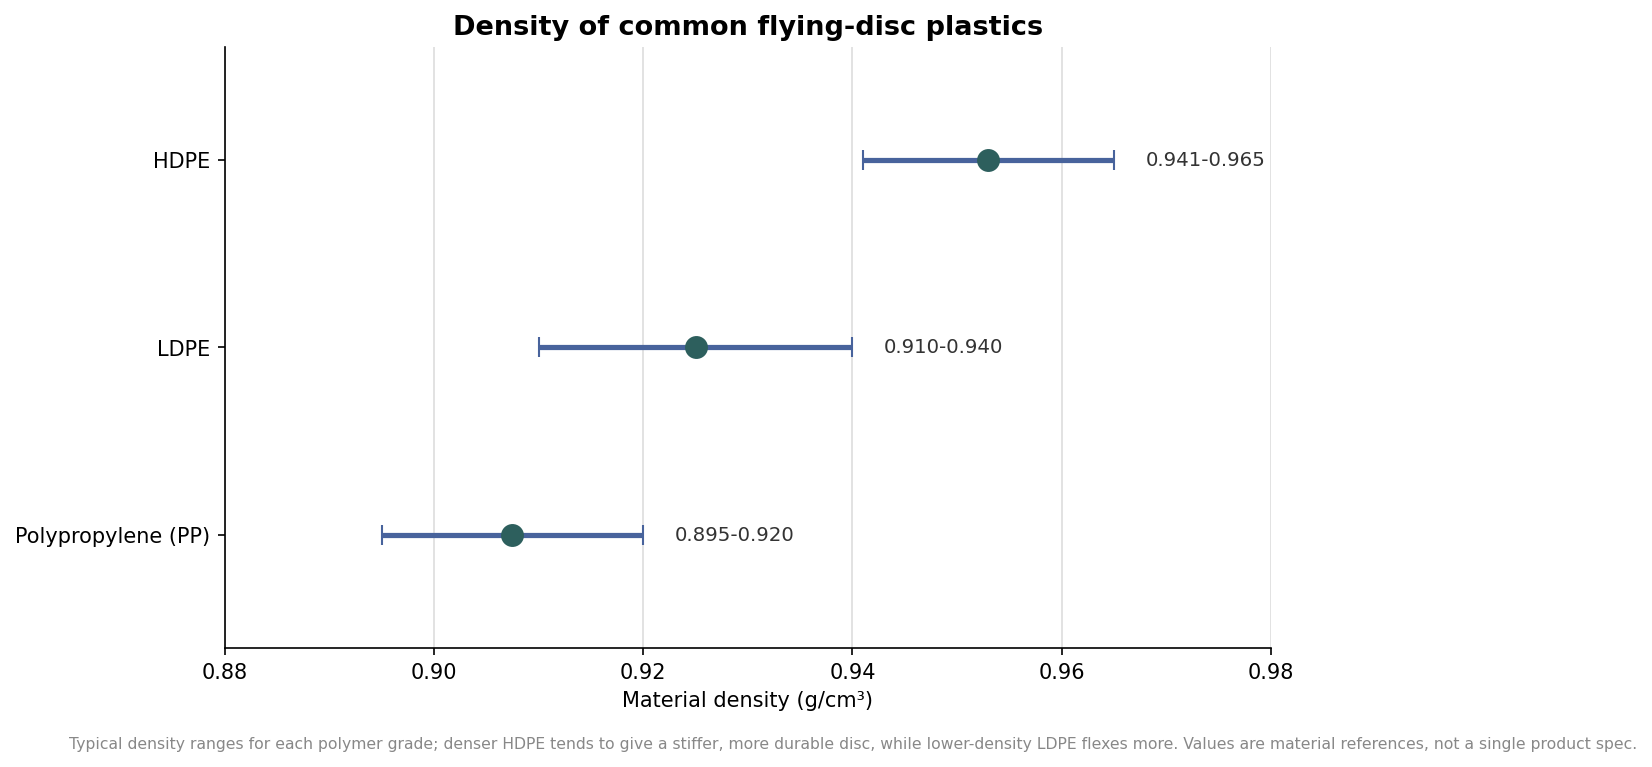
    Dot plot with range whiskers showing density in grams per cubic centimeter for polypropylene, LDPE, and HDPE flying-disc plastics
    Denser HDPE gives a stiffer, more durable disc; lower-density LDPE flexes more for casual throwers.

    Put the four levers together and the specification almost writes itself. For a children’s event, lean light and flexible: a lower-weight LDPE disc in the nine-inch range that is easy to throw and safe to catch. For a sports team or an adult league giveaway, move toward regulation weight and a stiffer plastic so the disc actually performs the way athletes expect. For a pure marketing keepsake that will spend its life on a desk, a mini disc is cheaper and does the job. Ask any supplier for weight, diameter, rim depth, and resin type before you commit, and treat the weight and diameter figures here as starting points to confirm against the specific disc you are quoting. Get those four numbers right and the print, which is the part everyone worries about first, becomes the easy part.
  • How to Print Your Logo on a Custom Frisbee: Choosing the Right Decoration Method

    How to Print Your Logo on a Custom Frisbee: Choosing the Right Decoration Method

    A logo on a flying disc has to survive being thrown, caught, and left in the sun, and it has to read clearly on a curved surface that is never quite flat. The decoration method you pick decides how many colors you can use, how much fine detail holds up, and what each disc costs. Approving a proof is a lot easier once you know how each method actually puts ink on plastic and which one suits the artwork you already have.

    Start with the disc, not the design

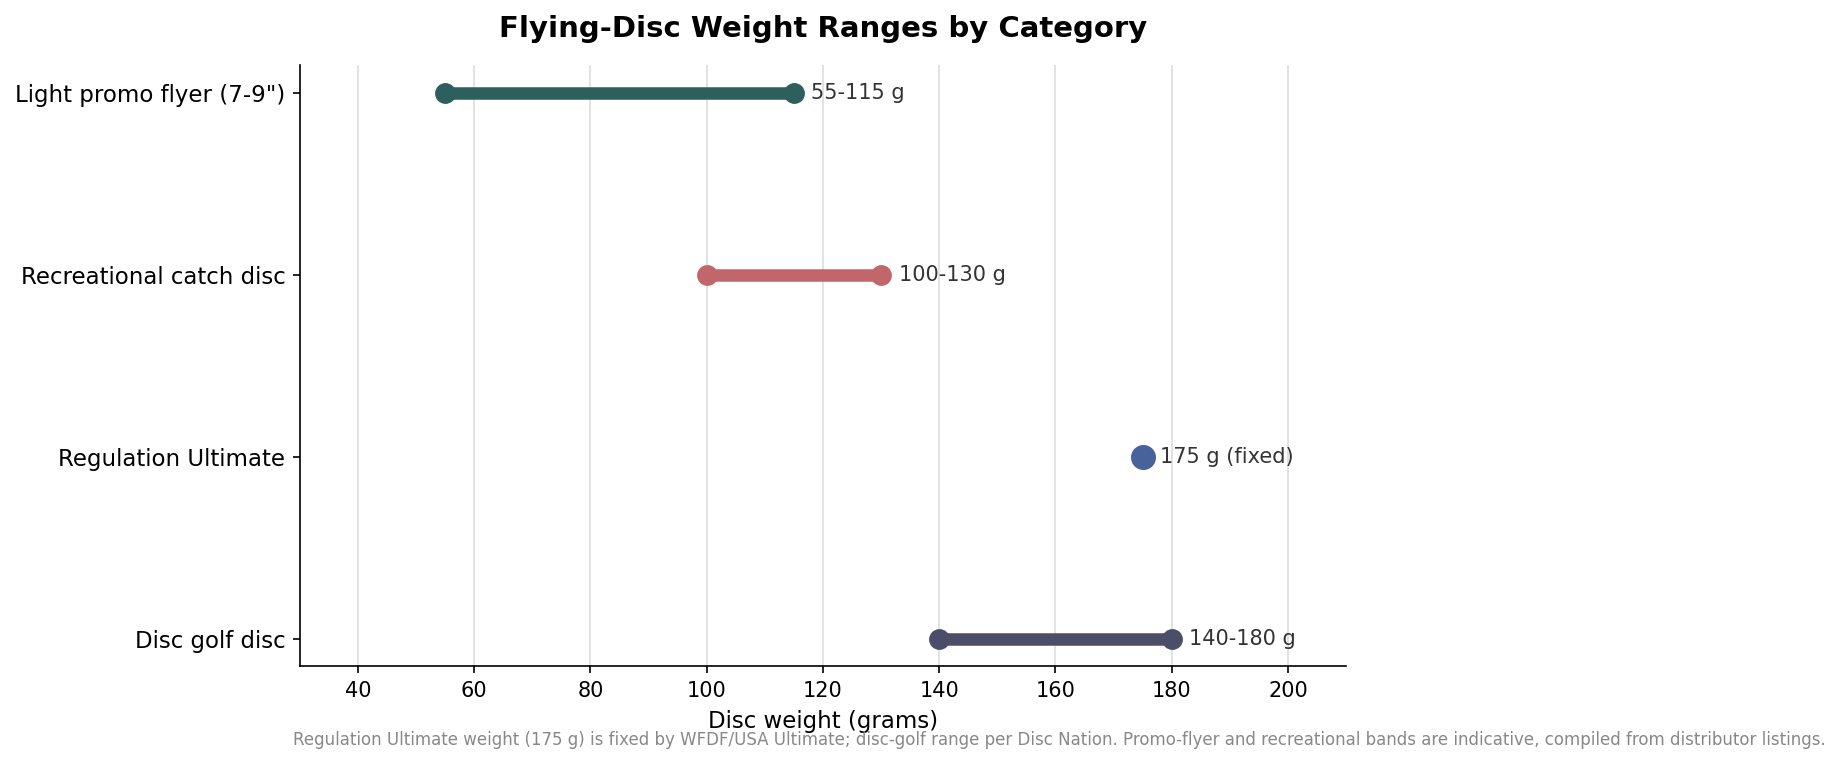
    The disc you choose sets the limits for everything that follows. Promotional flyers usually run 7 inches, 7.25 inches, or 9 inches across, with 9 inches being the most common giveaway size. Step up to a 10.75-inch disc and you are at the diameter of a regulation Ultimate disc, which weighs a fixed 175 grams and measures about 27.3 centimeters under WFDF and USA Ultimate rules. Weight tracks closely with intended use: light promo flyers land roughly in the 55 to 115 gram range, recreational catch discs sit a little heavier, and disc golf discs run from about 140 to 180 grams because they need mass to fly a fairway line.

    Material matters as much as size. Soft catch discs are typically molded from low-density polyethylene (LDPE), which flexes and is comfortable to catch, while disc golf discs use stiffer high-density polyethylene or polypropylene blends that hold an edge. The practical point for decoration is that your printable area is always smaller than the disc’s overall diameter. A raised outer rim and the curve toward the edge mean the usable imprint zone lives in the flatter center, so a 9-inch disc does not give you a 9-inch canvas.

    Range plot of flying-disc weight by category: light promo flyer 55-115 g, recreational catch disc 100-130 g, regulation Ultimate 175 g fixed, disc golf disc 140-180 g
    Typical flying-disc weight ranges by category, in grams.

    Pad printing: one color on a curved surface

    Pad printing transfers ink from an etched metal plate onto the disc using a soft silicone pad. Because the pad conforms to shape, it handles the gentle curve and any texture in the disc’s center better than a flat process would, which is why it is a workhorse for flying discs. Expect one color per pass, occasionally two, and a modest imprint area of a few inches. It is a strong fit for a clean, single-color wordmark or logo dropped into the recessed center of the disc. The main limitation is detail: hairline strokes and very small reversed type can fill in or drop out, so keep the art bold.

    Screen printing: spot color for bold, simple logos

    Screen printing pushes ink through a fine mesh stencil, using one screen per color. It shines when your logo is one to four solid spot colors, because you can match a brand color to a specific Pantone (PMS) reference and lay down opaque, vivid ink across a larger and flatter area than pad printing typically allows. The trade-off is setup: each color needs its own screen and its own registration step, so a three-color job carries more preparation than a one-color job. For bold marks, block text, and event names, screen printing is often the cleanest-looking and most cost-effective route once you are past the setup.

    Full color and in-mold: photos, gradients, and complex art

    When your artwork has gradients, a photograph, or more colors than screens can practically handle, you move to a full-color process. Digital and heat-transfer methods apply a printed film to a finished disc, while in-mold labeling (IML) fuses a printed film into the disc as it is molded, producing a durable, edge-to-edge graphic that resists scuffing. Full color carries its own setup, but because it does not charge per color, a detailed design or a row of sponsor logos can actually come in cheaper than forcing the same art through a four-color screen run. Reserve it for artwork that genuinely needs the range; a single-color logo does not.

    Prepping artwork and controlling cost

    Send vector art whenever you can. Files built in Illustrator or supplied as EPS or print-ready PDF let a supplier cut a sharp plate or screen; a low-resolution JPG pulled from a website usually will not hold up. Specify your Pantone colors rather than leaving them to interpretation, keep line weights above roughly 1 to 2 points, and avoid tiny reversed text that can close up on press. Ask the supplier for the exact imprint area in inches before you scale your logo, since that flat center zone is the real constraint. It is also worth confirming whether setup or per-screen charges apply and whether a one-color imprint is included at your quantity, because those line items move the true unit cost more than the disc itself does.

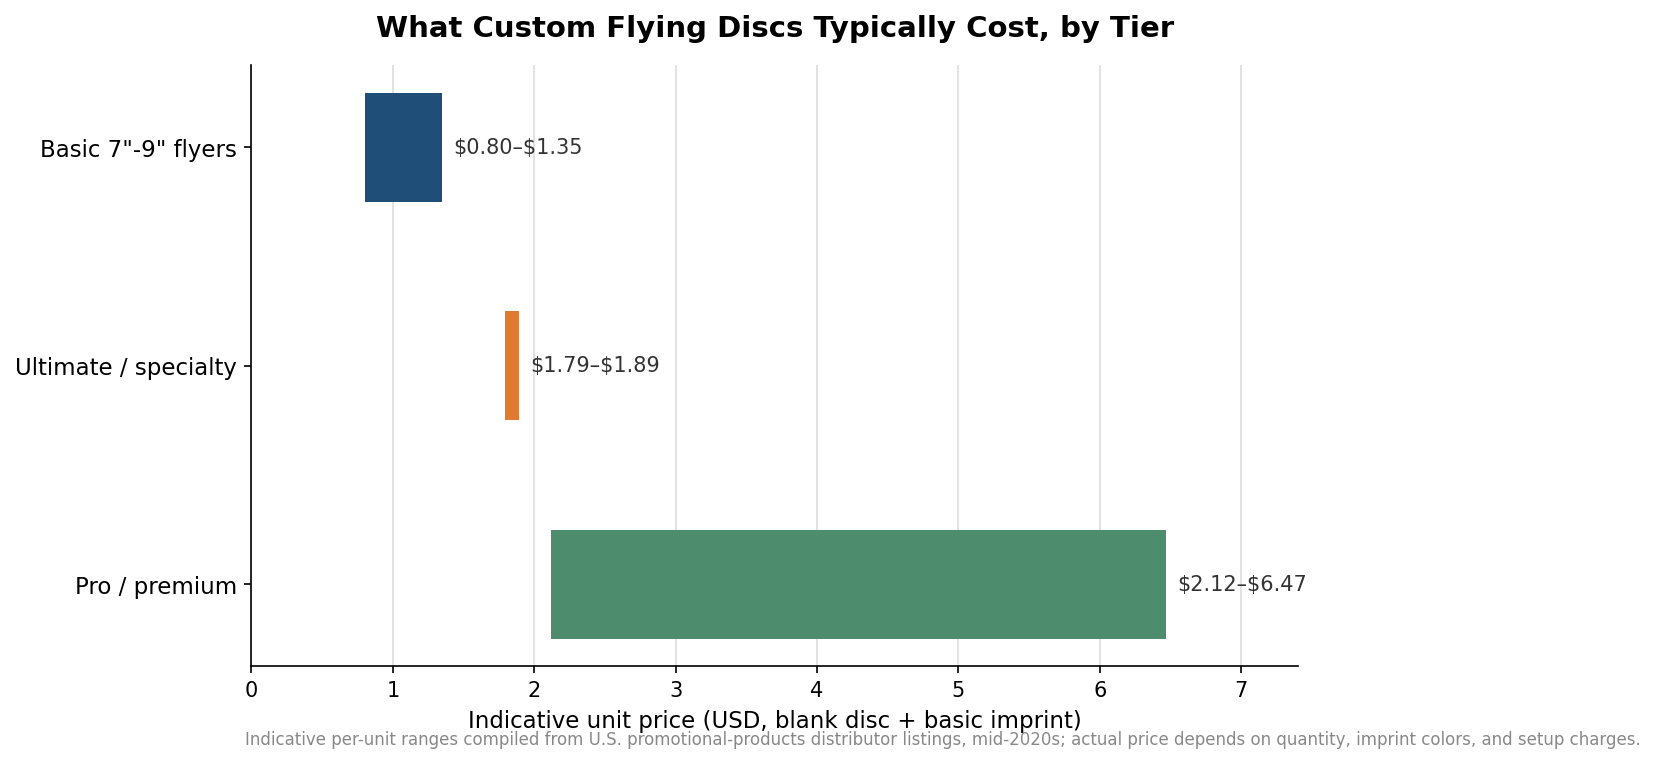
    On quantity, promotional discs commonly carry minimum orders in the 100 to 250 range, with the per-unit price dropping as volume climbs. The figures below are indicative ranges pulled from U.S. promotional-products distributor listings rather than a specific quote, but they show the shape of the market: basic 7-to-9-inch flyers are the value tier, ultimate and specialty discs sit a step up, and professional or premium discs span a much wider band depending on plastic and decoration.

    Horizontal bar chart of indicative custom flying disc unit prices by tier: basic 7-9 inch flyers $0.80-$1.35, ultimate/specialty $1.79-$1.89, pro/premium $2.12-$6.47
    Indicative promotional flying-disc unit prices by tier, compiled from U.S. distributor listings.

    Match the method to the artwork and the disc. A single-color logo on a budget giveaway points to pad printing; a bold one-to-four-color mark that needs a larger, crisper imprint points to screen printing; a photo, a gradient, or a dense sponsor layout points to full color or in-mold. And if the discs are meant for actual play rather than a shelf, get the weight right first: for regulation Ultimate, stick with 175 grams and treat the decoration as the finishing touch, not the starting point.

  • Custom Disc Golf Discs: How to Specify Plastic, Weight, and Stamp

    Custom Disc Golf Discs: How to Specify Plastic, Weight, and Stamp

    Ordering custom disc golf discs is a different exercise from ordering a promotional flying disc for a company picnic. A disc golf disc is a piece of sports equipment, and the people who catch one at your event or buy one from your pro shop will judge it by how it flies, how it feels in the hand, and how long the print survives a season in the bag. Before you approve a proof, you are really making four decisions: which mold to print, which plastic blend to use, what weight to specify, and how your artwork gets onto the disc. Getting each one right is the difference between a disc that gets thrown and one that ends up as a wall decoration.

    Start with the mold, not the artwork

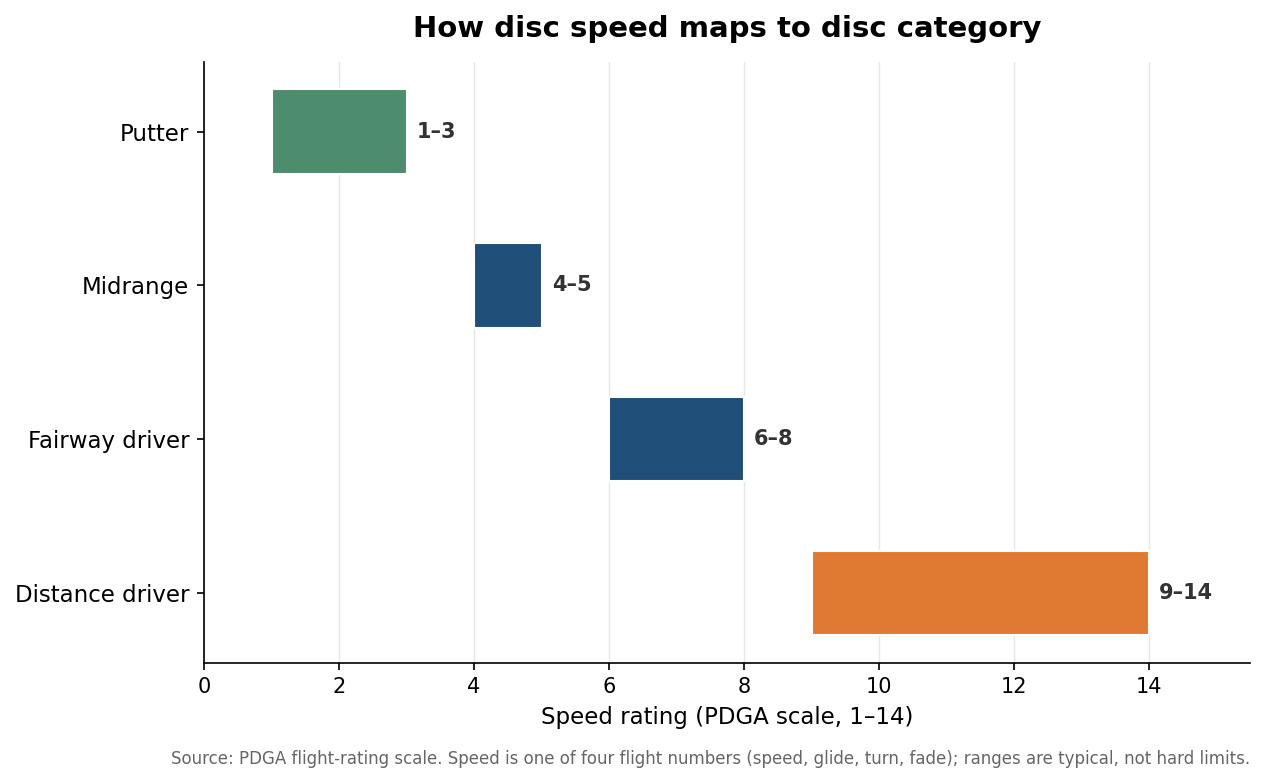
    Every disc golf mold carries four flight numbers, and they matter more than any design choice you will make. Speed runs from 1 to 14 and describes how fast the disc has to travel to fly as intended. Glide runs from 1 to 7 and measures how long the disc stays aloft. Turn runs from roughly +1 down to -5 and describes how much the disc banks right early in flight for a right-handed backhand thrower. Fade runs from 0 to 5 and describes how hard it hooks left at the end. A putter reads something like 2, 3, -1, 1; a fast distance driver might read 12, 5, -1, 3.

    The practical point is to match the mold to whoever ends up throwing it. High-speed drivers only fly correctly for players with real arm speed, and in a beginner’s hand they dump left almost immediately. If your discs are a tournament giveaway, a league fundraiser, or a brand promotion aimed at a general crowd, a low-speed putter or midrange in the speed 2 to 5 range is far more forgiving and will actually get used. Save the speed 12 drivers for an audience of players who asked for them.

    Range chart showing PDGA speed ratings by disc category from putter to distance driver
    Speed rating maps directly to disc category; match it to who will throw the disc.

    Match the plastic to the budget and the use

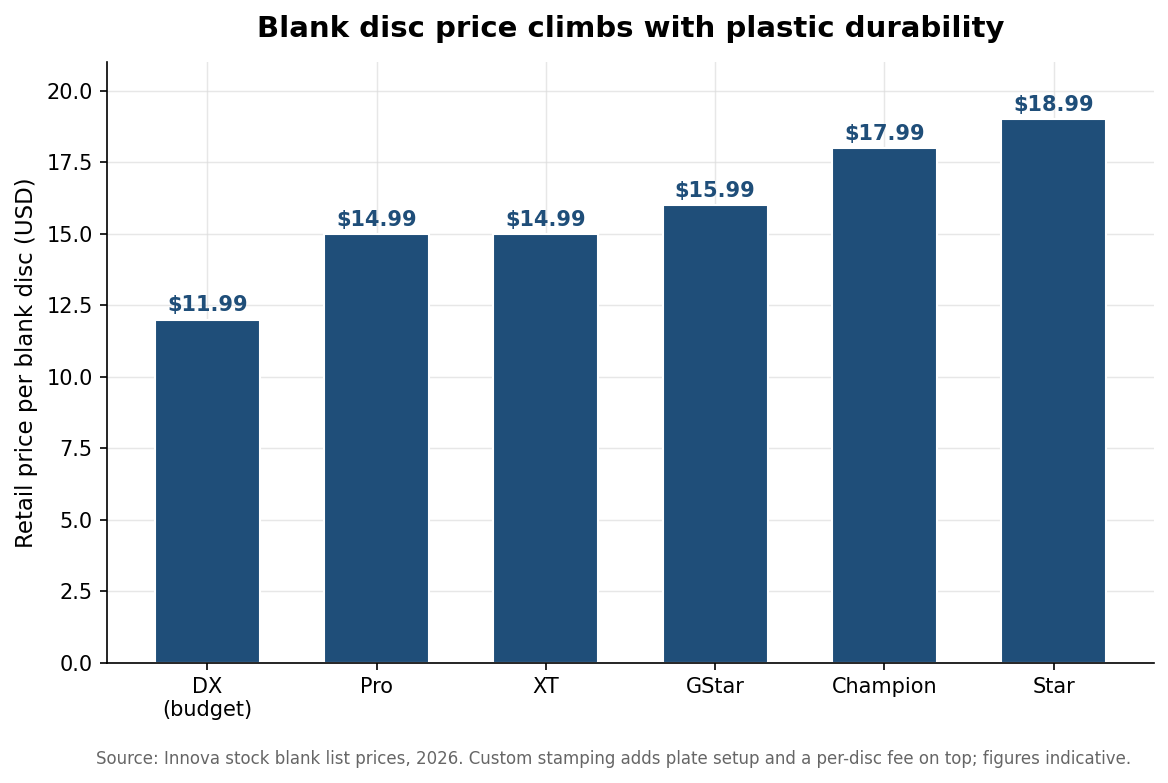
    Plastic blend sets both the feel and the price, and the gap is wide. Base plastics such as Innova’s DX list around twelve dollars a blank; they are grippy and cheap but wear quickly, which for a giveaway is often fine. Mid-grade blends such as Pro and XT sit near fifteen dollars and hold up better. Premium blends such as Champion and Star run eighteen to nineteen dollars a blank, resist trees and pavement, and keep their flight characteristics far longer. Those are stock blank prices, and custom stamping adds plate setup and a per-disc fee on top, so treat them as a floor rather than a final number.

    The blend you choose should follow the job. For a five-hundred-disc promotional run where cost per unit is the whole ballgame, base plastic keeps the total sane and nobody minds that a free disc wears in. For a players’ pack, a resale run in a shop, or a club’s tournament stock, premium plastic is worth the premium because the buyer expects a disc that survives the season and the print that survives with it.

    Bar chart of disc golf blank prices rising from DX budget plastic to premium Star plastic
    Plastic blend is the biggest lever on per-disc cost, before stamping is added.

    Get the weight right

    Most disc golf discs are produced somewhere between about 150 and 176 grams, and the number is stamped or written on nearly every disc for a reason. The PDGA caps maximum weight relative to diameter, working out to roughly 8.3 grams per centimeter, or about 175 grams for a standard driver, so you will rarely see a legal disc heavier than that. Within the usable range, lighter discs in the 150 to 165 gram band are easier for beginners, younger throwers, and anyone with lower arm speed to get moving, and they float better on water. Heavier discs in the 170 to 176 gram band hold a line better in wind and resist getting turned over by a strong arm.

    If you are buying for a known audience of players, ask what they throw. If you are buying for a mixed or unknown crowd, a middle weight around 165 to 172 grams is the safe compromise that most hands can handle. These bands are indicative rather than rules; a specific mold in a specific plastic will feel slightly different, and a run-to-run weight tolerance of a few grams is normal in manufacturing.

    Specify the stamp before you approve the art

    Most custom discs are decorated by hot stamping, where a heated die presses colored foil onto the flight plate. It is durable, it is the industry standard, and it is what drives your setup cost. Each foil color generally needs its own stamp plate, and plate setup commonly runs around one hundred dollars per color, so a single-foil design starts near one hundred dollars in setup while a three-foil design can carry three hundred dollars in startup charges before a single disc is stamped. Minimum orders for hot-stamped customs typically begin around one hundred discs, which is why the first disc is expensive and the hundredth is cheap.

    Design details matter to the die. A two-color foil job needs at least a 1/16-inch gap between the colors so they do not bleed together, oversized stamps can add a per-disc stamping fee on the order of two dollars plus a larger die charge, and artwork should be supplied as clean vector or at 300 ppi at print size, usually in grayscale, sized to the roughly 5.25-inch print area on a standard disc. If you need full-color or photographic artwork rather than flat foil, dye sublimation processes such as DyeMax handle that, and one-off artistic dyes exist for short runs, though neither is the tool for a large economical order.

    Put the four decisions together before you pay for anything. Lock the mold and its flight numbers to your audience, choose a plastic blend that fits the budget and the expected use, pick a weight band, and settle the stamp method and foil count. Then confirm your artwork format and the lead time, which often runs a few weeks once a plate is cut. Because setup fees are fixed and per-disc costs fall with volume, the cheapest path is almost always to decide everything once and order the whole quantity in a single run rather than reordering a plate you have already paid to create.