A logo on a flying disc has to survive being thrown, caught, and left in the sun, and it has to read clearly on a curved surface that is never quite flat. The decoration method you pick decides how many colors you can use, how much fine detail holds up, and what each disc costs. Approving a proof is a lot easier once you know how each method actually puts ink on plastic and which one suits the artwork you already have.
Start with the disc, not the design
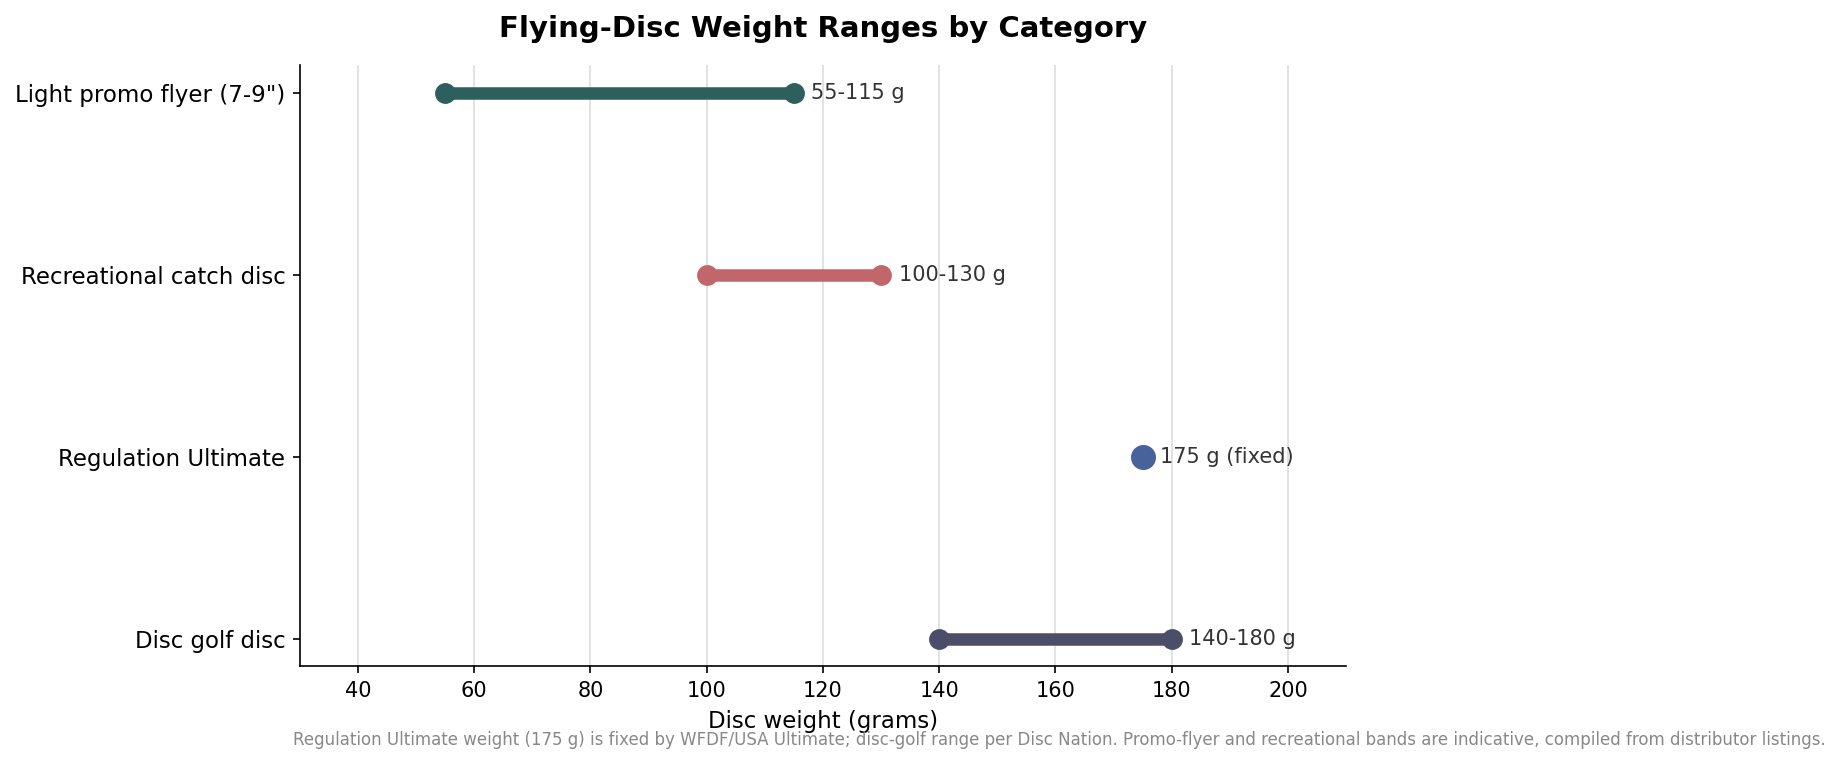
The disc you choose sets the limits for everything that follows. Promotional flyers usually run 7 inches, 7.25 inches, or 9 inches across, with 9 inches being the most common giveaway size. Step up to a 10.75-inch disc and you are at the diameter of a regulation Ultimate disc, which weighs a fixed 175 grams and measures about 27.3 centimeters under WFDF and USA Ultimate rules. Weight tracks closely with intended use: light promo flyers land roughly in the 55 to 115 gram range, recreational catch discs sit a little heavier, and disc golf discs run from about 140 to 180 grams because they need mass to fly a fairway line.
Material matters as much as size. Soft catch discs are typically molded from low-density polyethylene (LDPE), which flexes and is comfortable to catch, while disc golf discs use stiffer high-density polyethylene or polypropylene blends that hold an edge. The practical point for decoration is that your printable area is always smaller than the disc’s overall diameter. A raised outer rim and the curve toward the edge mean the usable imprint zone lives in the flatter center, so a 9-inch disc does not give you a 9-inch canvas.
Pad printing: one color on a curved surface
Pad printing transfers ink from an etched metal plate onto the disc using a soft silicone pad. Because the pad conforms to shape, it handles the gentle curve and any texture in the disc’s center better than a flat process would, which is why it is a workhorse for flying discs. Expect one color per pass, occasionally two, and a modest imprint area of a few inches. It is a strong fit for a clean, single-color wordmark or logo dropped into the recessed center of the disc. The main limitation is detail: hairline strokes and very small reversed type can fill in or drop out, so keep the art bold.
Screen printing: spot color for bold, simple logos
Screen printing pushes ink through a fine mesh stencil, using one screen per color. It shines when your logo is one to four solid spot colors, because you can match a brand color to a specific Pantone (PMS) reference and lay down opaque, vivid ink across a larger and flatter area than pad printing typically allows. The trade-off is setup: each color needs its own screen and its own registration step, so a three-color job carries more preparation than a one-color job. For bold marks, block text, and event names, screen printing is often the cleanest-looking and most cost-effective route once you are past the setup.
Full color and in-mold: photos, gradients, and complex art
When your artwork has gradients, a photograph, or more colors than screens can practically handle, you move to a full-color process. Digital and heat-transfer methods apply a printed film to a finished disc, while in-mold labeling (IML) fuses a printed film into the disc as it is molded, producing a durable, edge-to-edge graphic that resists scuffing. Full color carries its own setup, but because it does not charge per color, a detailed design or a row of sponsor logos can actually come in cheaper than forcing the same art through a four-color screen run. Reserve it for artwork that genuinely needs the range; a single-color logo does not.
Prepping artwork and controlling cost
Send vector art whenever you can. Files built in Illustrator or supplied as EPS or print-ready PDF let a supplier cut a sharp plate or screen; a low-resolution JPG pulled from a website usually will not hold up. Specify your Pantone colors rather than leaving them to interpretation, keep line weights above roughly 1 to 2 points, and avoid tiny reversed text that can close up on press. Ask the supplier for the exact imprint area in inches before you scale your logo, since that flat center zone is the real constraint. It is also worth confirming whether setup or per-screen charges apply and whether a one-color imprint is included at your quantity, because those line items move the true unit cost more than the disc itself does.
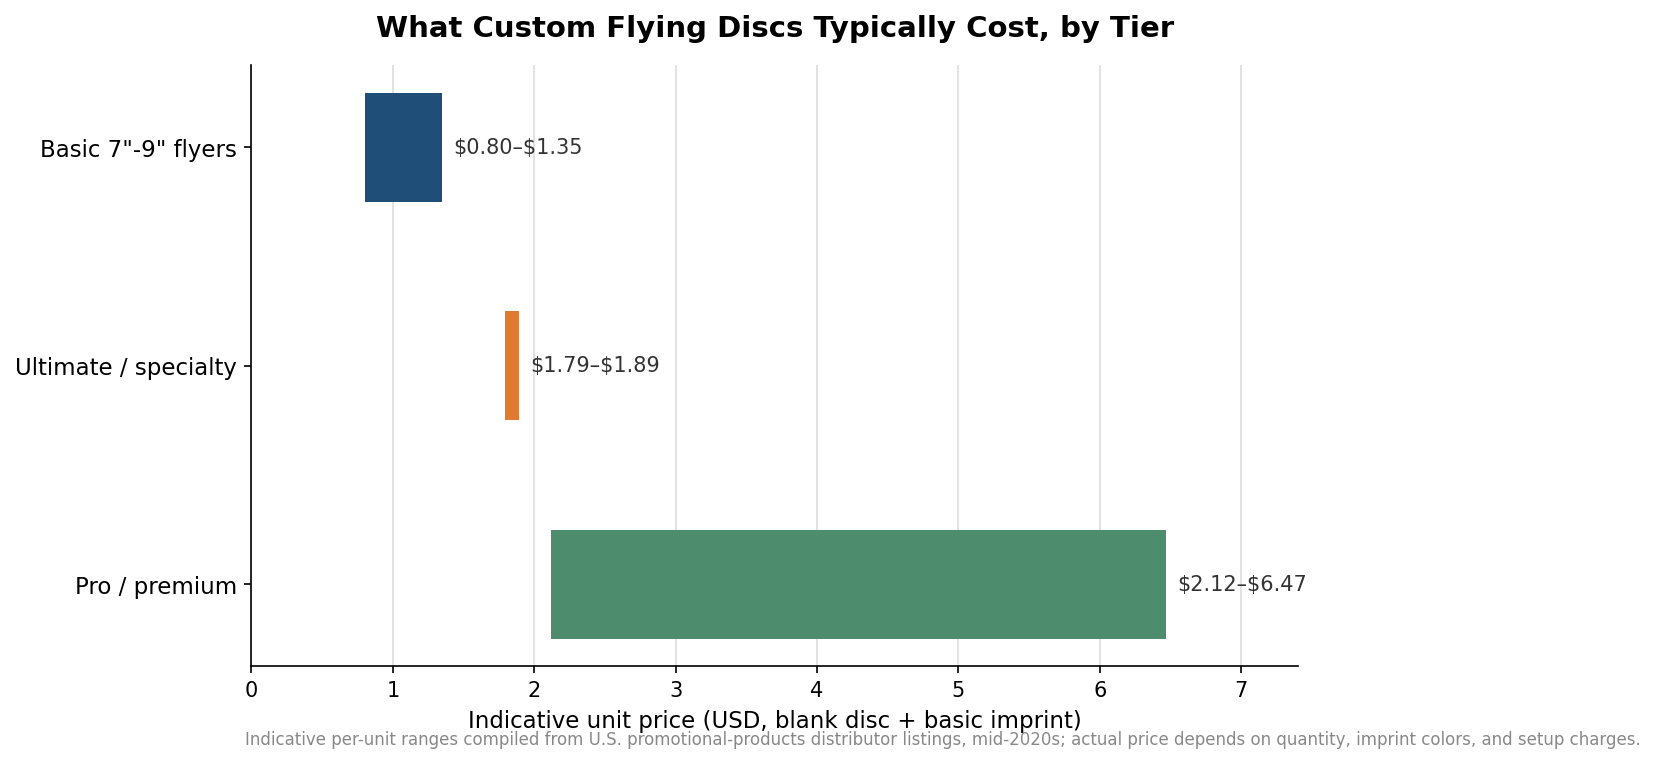
On quantity, promotional discs commonly carry minimum orders in the 100 to 250 range, with the per-unit price dropping as volume climbs. The figures below are indicative ranges pulled from U.S. promotional-products distributor listings rather than a specific quote, but they show the shape of the market: basic 7-to-9-inch flyers are the value tier, ultimate and specialty discs sit a step up, and professional or premium discs span a much wider band depending on plastic and decoration.
Match the method to the artwork and the disc. A single-color logo on a budget giveaway points to pad printing; a bold one-to-four-color mark that needs a larger, crisper imprint points to screen printing; a photo, a gradient, or a dense sponsor layout points to full color or in-mold. And if the discs are meant for actual play rather than a shelf, get the weight right first: for regulation Ultimate, stick with 175 grams and treat the decoration as the finishing touch, not the starting point.
Leave a Reply